
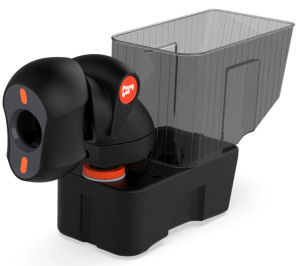
I was contacted by a new Chinese-based company called PONGBOT who make a variety of table tennis robots. When I was asked if I would review one of their robots, the Nova S Pro, I accepted. The Nova S Pro is their most basic and cheapest robots (retails for under USD$400!), but perfectly suitable for beginner to intermediate players.
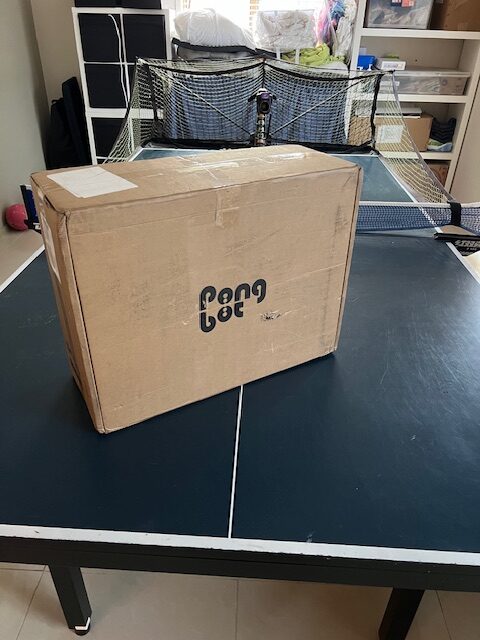
A couple of weeks later I received the box with the robot. The unit was very well packed in the box. The robot fully enclosed with molded foam for protection. Out of the box, the robots fits snugly in the ball container. Once you carefully pull this out, the ball container fits onto the back of the robots, held by two sliders and secured by a screw. it’s further secured by a nylon & elastic strap, which goes underneath the robot, and attached to either side of the top/front of the ball container. It looks looks very neat and secure.
Note: If you did not get order this robot with the ‘deluxe carry set’, I would recommend you keep the original box and foam cutout, which makes makes it easy and safe to transport.
 |
 |
 |
 |

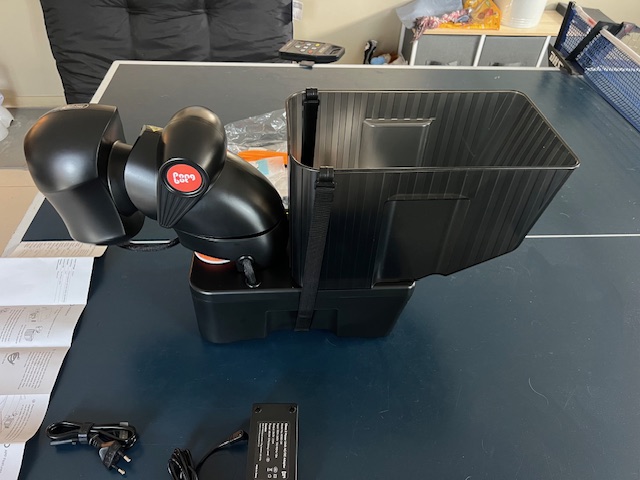

Robot itself feels very solid, with smooth edges and a quality finish everywhere. Wide rubber feet on the bottom keeps it very steady on the table and ensure it does not scratch the table surface.
Comes with basic fold-out instruction leaflet with good diagrams to show how to assemble the unit, and instructions are written in clear English only.
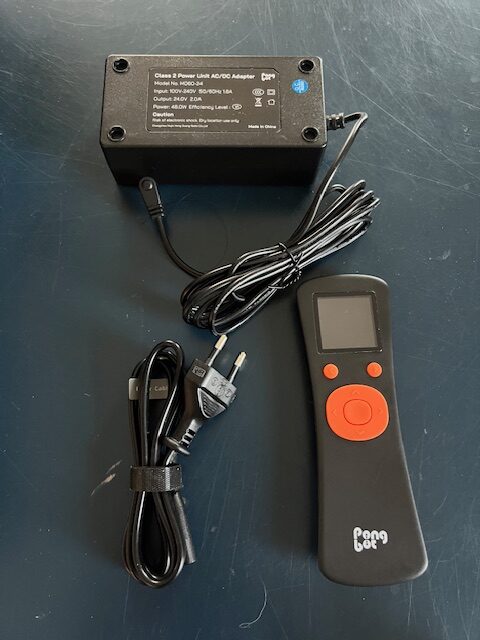
Included was a remote which requires two AAA batteries (not included). Remote looks quite basic with an LCD display, and matches the block/orange colour scheme of the robot. The robot can be controlled either via the remote or via a dedicated App on your phone. I suspect most users would prefer the App, but the remote may be useful for quick and simple session.
Power supply looks of high quality. Input is 100V to 240V 50/60Hz, so it should work anywhere in the world. A separate 2-pronged power cable plugs into the supply on one side, and has a power plug on the other. Currently it only comes with the option of US/UK/EU plug, so for Australia I need an adaptor (which they advised my off beforehand). I chose the EUR plug as I have plenty of adaptors.The output of the power supply is 24V 2A.
So I plugged in the power cable at the bottom/back of the robot, and switched on the switch next to it. Two bright blue lights at the front of the robot head lit up immediately.
I was going to create an unboxing video, but the setup video by Pongbot pretty much does this already, including the basic setup. You can see it here:

Next I downloaded the Pongbot app as instructed by the manual. Once downloaded I started the App, requiring me to create an account. All it needed was an Email address, and once this was confirmed, I needed to create a password and log in.
Then it was a simple matter of connecting via bluetooth, which was quick and seamless. Once connected, it asked me to update to the latest version, which I did, and it only took a few minutes to complete. From there it was ready to use.
The neat thing about a robot that sits on top of the table, is that you can place in any position on the table, as opposed to the larger robots which are usually positioned only in the middle of the table. This is ideal for simulating servers, like the Pendulum serve which is typically done from the corner of the table. So I decided to make this my first test, which allowed me to get familiar with the App, and test something that would be useful to lot of players.
Test 1: Simulating Pendulum serves to 3 positions
The serve I’m attempting to simulate is a backspin/sidespin pendulum serve by a right-hander from the left-hand side of the table. I’m not going to cover the technique on how to perform this serve as you can look that up yourself, but I want the serve to have backspin and sidespin, bounce on the other side of the table first, then go the forehand side, the next one to the middle, the 3rd one to the backhand side, and then repeat this. We want the second bounce on the receiver side of the the table to be near the edge, which is tactical as it makes the receiver hesitate as to whether is deep enough to go over the end so that it can be looped, or if it needs to be pushed/flicked.
I’ll go through the pages of the App below, to make it easy for others to try as well.
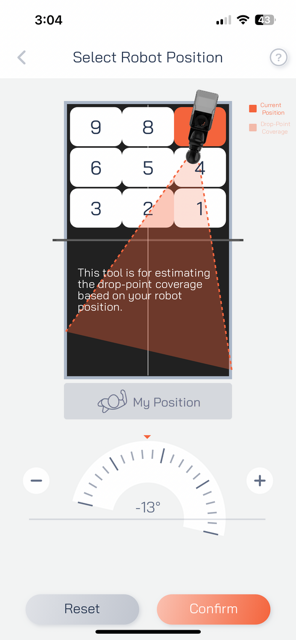
Step 1: Go the to Custom Drill and create a new Drill. This will take you to page 1, where you select where the robot is situated (position 7 in this case), and you select the range of angles (press the + and – buttons) over which you wish to launch the balls. Once you confirm it takes you to page 2.

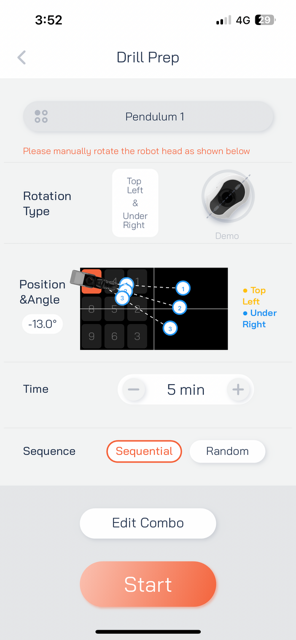
Step 2: This is where you control everything, and you’ll see why I think I’m so impressed with this robot and particularly with the App.

On the top row you select the type of spin you want, which is “Under Right” in this case, meaning it’s underspin (backspin) and spinning to the right. The picture on the end shows you which way you need to rotate the head. The head clicks into position at 45deg, which means you’ll get roughly 50% of backspin and sidespin. Other angles may be possible, but it does not click into other positions for this robot.
The next option is the ball height, which is the inclination at which the ball comes out. Since I’m trying to simulate serves, I want to direct the ball as short as possible, so that it bounces on the server’s side of the table first, before it bounces to the other side.
What’s really neat is that the two pictures below this actually show where the first and second bounces occur, as this varies as you change the options. It’s quite accurate too, which is impressive and very helpful for the user.
The next bit is where choose the spin type. For this particular robot head position, you can either produce left/topspin or right/backspin, depending on which direction the internal wheels spin. for the serve it’s sent to Under/Right.
Next is the ‘drop point’, which is actually the angle within the range of angles set by step 1. The name of this option is a little confusing, but as you vary it you’ll see the ball position change in the picture above, so it’s becomes quite obvious. I wanted the first ball to land near the forehand, so I adjusted the point until the diagram showed this position.
Next are the Speed and Spin settings. The ideal serve would be heavy spin at low speed, but obviously there are physical limitations to this. In the App the maximum spin depends on the speed setting, so I needed to find the minimum speed for which the spin was high enough to make it realistic. I found that for a speed setting of 1.5, I could increase the spin to 5.0, which is pretty decent spin, the sort of spin that you find at mid-club level players.
To see the next two options you need to swipe down a little further, and you can set the frequency and ‘number of repetition’. The frequency refers to how quicky the next ball comes out after the previous one. I set this to 10% for testing purposes. The ‘number of repetition’ refers to how many balls are placed to this same position before it moves to the next one. I set this to 1. Now we move onto the second ball in the drill.
Step 3 and 4:
In the middle of the display you’ll see circles with numbers 1, 2, 3 and +. Press 2 to the to the second ball in the drill. When you click it, all the values reset to the default again, so you’ll need to put in all the values again. One recommendation I would have for future updates of the App, is that it remembers (and copies) and values from the previous balls, so that you can make adjustment from the first ball without having to remember the values.
As you can see from the setting below, I’ve set the values the same, apart from the drop point, which simulates the same serve to three different positions on the table.
 |
 |
Once this is finished you same it (it will ask you to name the drill), and you can test the Combo and edit values as you see fit. Select this particular drill from the ‘Custom Drill’ section will show you a visual representaiton of the drill, and you can adjust the time, as seen below.
Without tweaking the values, I made this first video to show the robot in action. Ball positions are not that consistant, but this is more likely due the variety of balls that I use (quality and brand), so I’m sure it would be more consistant if I only used the same balls and they’re all 3*.

As you can see from this rough video, the ball simulate the pendulum serve from 3 different positions. The balls bounce twice on receiver’s side of the table before it bounces over the end, so the return must be pushed back or flicked, which is quite a realistic situation.
Spin on the serves are moderate, which you would expect from the mid-level club player. If you push the ball back without adjusting from the sidespin, there is enough spin for it to miss the other side of the table completely, which is great!
The App is most impressive, the best I’ve seen. The clear naming of the options, and visual changes displayed as you vary the different settings makes it very intuitive.
Visit the PONGBOT store here and get 5% discount*
Alternatively use the PONGBOT Voucher Code OOAK5 for 5% discount
*This is a referral link. If you buy via this link, you’ll get 5% discount and it earn me (the reviewer) a small commission.